Search This Blog

Wednesday, September 14, 2011

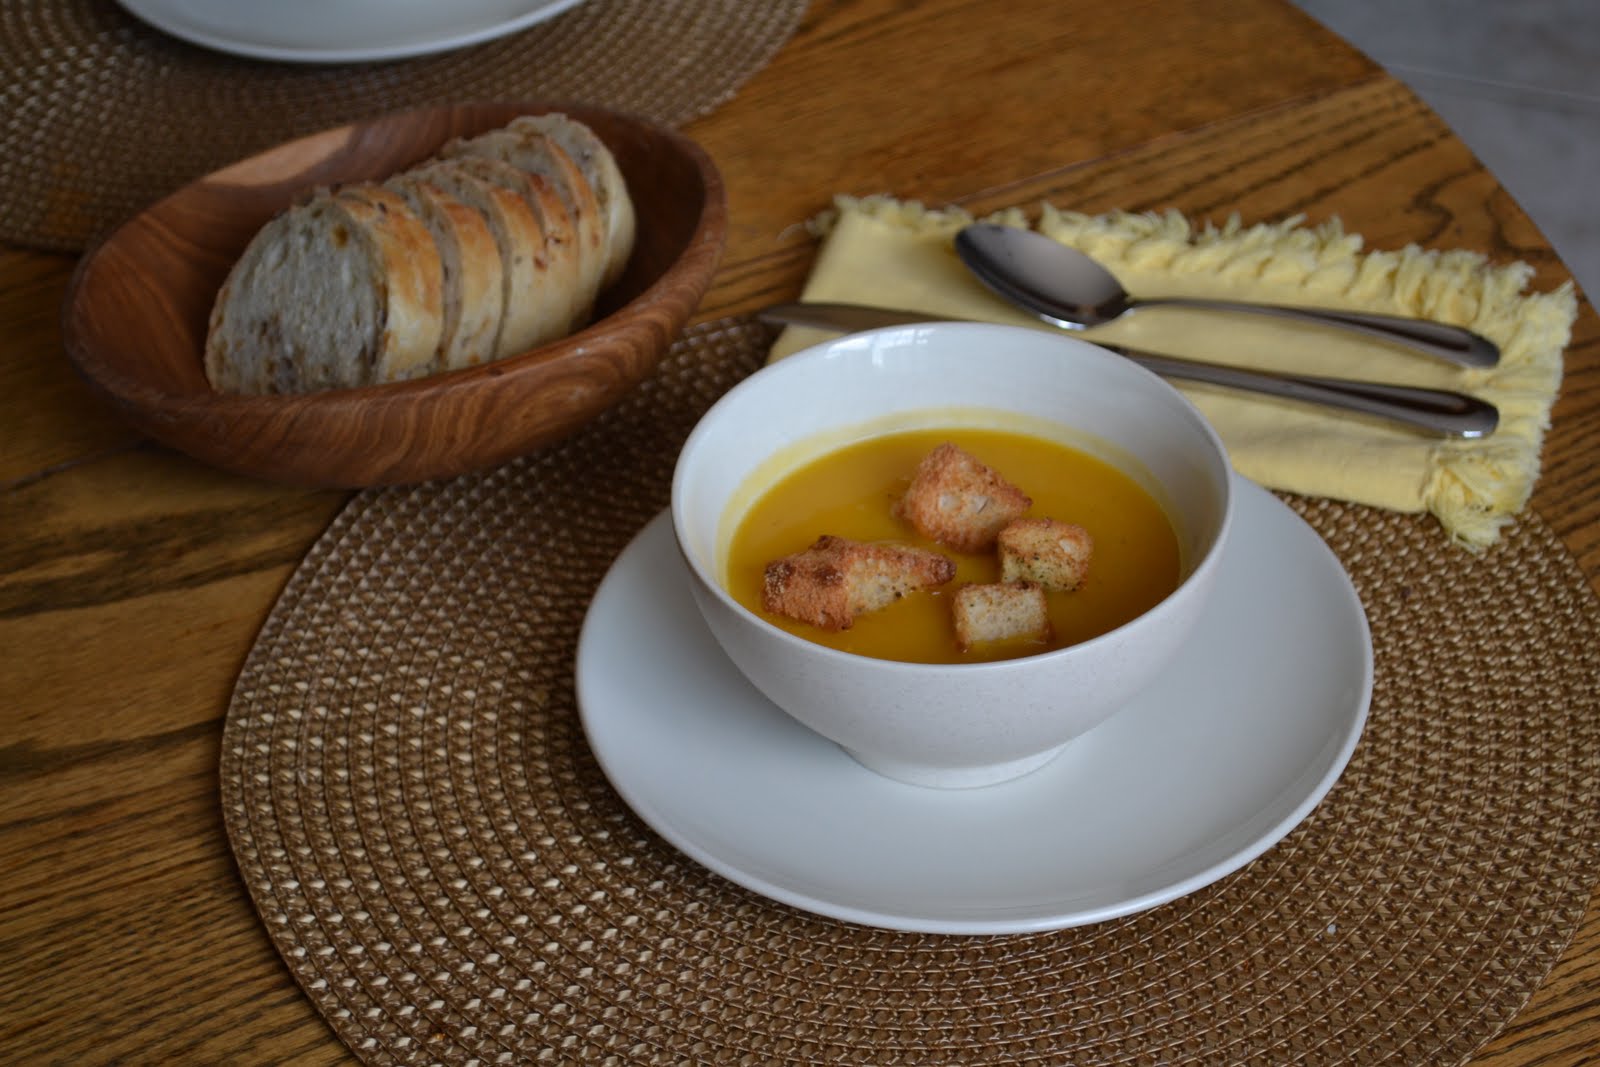
Squash and Pear Soup

Fall is in the air.  Watching the fall colors begin to blanket the trees brings my heart joy! This is definitely my favourite time of the year. And it is soup and crockpot season. 
Squash is not something that I grew up eating in Newfoundland. I think that it is something that would grow well there but it just never took off in my family or, in my best estimate, in the province.  But since coming “up along” (i.e. moving to Ontario), squash has become a favourite. Using the recipe below you can go in a number of different directions depending on your own personal taste making it incredibly versatile. You can incorporate a little curry, peanut butter and cilantro to make it Thai (a la my Step-daughter) or even add a little maple syrup and some other spices to make to even more fall’ish.  It makes a great starter to a Thanksgiving dinner party, well in my opinion almost any dinner party.
3 tbsp
Butter
1
Onion, chopped
1 tsp
Ginger (more or less to taste)
2 cloves
Garlic, minced
1
Butternut Squash, chopped – here is a little hint, peel the squash before you cut it up with a vegetable peeler. This will save you a lot of heartache. Or for an extra boost of flavour roast the squash (375C for 40-50 minutes) then just scrape off the peel.
2
Potatoes, peeled and chopped
2
Pears or apples, peeled and chopped
5 cups
Chicken stock ( I try to find the stock with the least amount of salt possible giving me more control over the seasoning)

Salt and Pepper to taste


In a large pot, melt butter over medium heat add onions, ginger and garlic until soft, about 5 minutes.  Add squash, pears, potatoes and chicken stock and bring to a boil. Reduce temperature and cook until all the vegetables are soft. Puree with a hand held blender or in a blender. I recommend using the hand held if you have one as it makes clean up a lot easier.
You can serve it with a few croutons on top or even a little sour cream.
To make Thai – add 1 tsp curry powder (more or less to taste), 2 tbsp peanut butter (I like the stuff that is just peanuts but my preference), and 1 tbsp cilantro (more or less to taste)
To make it fall’ish – add 2 tbsp maple syrup when you puree
For more spice flavour – add a dash or two of cinnamon, nutmeg, all spice, etc to the pot.
To make creamier – add ½ cup heavy cream when you puree
Anything goes!

Squash and Pear Soup with Roasted Garlic Crusty Bread.


ENJOY!

Tuesday, September 13, 2011

Dry Aged Beef

This next post is definitely NOT for the vegetarians, vege-quariums, or those who do feathers and fins. This post is about meat – more specifically beef. And not just any beef – dry aged beef.
I have seen this on the menu at restaurants a number of times (along with a hefty price tag) but had never ordered it.  The first time that I actually had the privilege of eating this was a number of months ago, when our neighbours, who enjoy experimenting with food, dry aged a roast. And it was so tender with concentrated beef flavour that I decided that I must also give this a whirl!
I have done my re-con and googled this to death.  I am a little worried about spending a bundle on meat only to have it ruined or, worse, send someone to hospital due to my “culinary adventure”.  Dry aging beef is a pretty simple process with amazing results.  It is a technique done by butchers and chef, where they hang beef or wrap in cheesecloth for anywhere from 8-45 days in a temperature controlled (about 37F) environment. The reason for doing this is that it breaks down the meat making it tenderer; it dehydrates the meat thereby concentrating the flavour.  While in the Napa Valley, we were at the Oxbow Market and happened by the Five Dot Ranch (www.fivedotranch.com) booth.  They happened to have some dry-aged meat there so I took the opportunity to chat about technique and what to look for. The guy at the booth was wonderful and gave me several hints of what to watch for and things to consider. An important thing to think about is the smell as an indicator of spoiling – so he let me smell his meat! (LOL) Really, the older the meat gets it should begin to smell like prosciutto and not sulphur or lemons.
So here is what I have done so far....
1.       Wash and dry the meat
2.       Wrap in cheesecloth
3.       Place on a wire rack on a cookie sheet
4.       Place in fridge – preferable one that you can leave closed for the majority of the time otherwise the temperature will not be as constant as necessary.  We happen to have a bar fridge that can be used for this purpose, but the moment we open it we lose all the coldness
5.       Wait
Meat washed and ready to be wrapped

I will rewrap the meat every couple of days just to make sure the cheesecloth is not sticking but otherwise I am waiting it out.


Meat wrapped and placed in the fridge for 2 weeks

I had a very large piece of meat that I have split in two pieces. I am planning to cook the first one in 14-15 days and if everything goes well the other piece after 30 days. When I pull them out, I will need to trim the meat of dry outside layer before cooking.
Seems easy enough, although the waiting is going to kill me!  I am used to being able to fuss with stuff and to not be able to watch it change and monitor every minute is a little nerve racking! 
I think self explainatory!

Monday, September 12, 2011

Some thoughts on wine and a little trip to Napa!


I have one rule when drinking wine...drink what you like! It is really that simple. Wine has all sorts of pretension around it, but this is highly unnecessary. Wine has been around since the dawn of time and celebrated by and for the gods! The ingredients are pretty simple: some grapes, some sunshine, some rain, a little yeast and time. How hard can it be? I am sure you can make bad wine but I have not found it yet – there is definitely wine that I do not like (but that is my personal taste) and some that give me headaches (grrr phenols!) but by and large I will try anything. I have had, and loved, some very cheap wines and some more expensive wines.  So drink what you like.


One night when we were avoiding the crowds at Halloween, Geoff and I headed to a local restaurant (sadly now closed). There were only a few people in the place so the waiter had some time to try out some of his new “wine toys” with us.  This is when I learned about an aerator.  We taste tested wine that had not been run though the aerator and some that had.  I was surprised at the difference. I have heard “people” talking about “opening up wine” and “letting it breathe” but never really believed it mattered.  I was like most people and drank wine within a few hours of buying. So this enables me to improve the taste of the wine and drink it shortly after it is bought!  You can pick them up for between $20 -$ 100, depending on how fancy you want to be or just pour it into a different bottle and wait an hour or so.
There are so many hobbies out there – camping, hiking, stamps, etc, I just like good food and many of the things that go with it. Wine just happens to be one of those things that go delightfully with food. Honestly, you can pair anything with food including beer, even scotch, but wine is definitely the most common.  So we tend to like to explore the wineries in the Niagara Region but this past weekend we were in San Francisco for work and were able to plan a long weekend to spend in the Napa Valley.  What a treat! I never expected to be able to go so to be able to blend work and pleasure it was all the better. 
There are hundreds of wineries in the Napa Valley, some very big and some very small. We only managed to get to 5 while there, but enough to get a nice sample. The weather there is incredible, about 31C during the day with no humidity and about 10C over night. The views were amazing, photo-ops galore!  
Roses are traditionally planted at the end of the vines - red for red wine and white for white wine

The weather and the land directly will impact on the grapes and the wine.  We tasted one wine that was exposed to the smoke from the fires that were in the area in 2008 and there was a smoky flavour to the Pinot Noir.  This year was very rainy in June and the grapes have not had as much sunshine.  Normally, everything would be harvested by this time, but most wineries are not starting until this week and should be all done in about 4 weeks.  I am including a little information and of some of the wineries we tried. I did a little searching when we got back and we can get some of these at my local liquor store, so you might be able to get them also. But these are my favourites – drink what you like!
The first place we went to was Domaine Carneros (http://www.domainecarneros.com//index.cfm). We had a wonderful host! He convinced us to have the Sparking and Pinot Noir and cheese pairing plate.  It was 10am – it was 1pm in Ontario so that makes it ok to indulge in the morning! Both of these were just wonderful. And the views of and from this location was just stunning.

Domaine Carneros

Who says wine only comes in one size of bottle

View from Domaine Carneros
Our next stop was Etude (http://shop.etudewines.com//index.cfm).  This was the first place that I had heard of wineries using heirloom grapes.  There has been a great interest in heirloom vegetables, mostly tomatoes, but this was the first time that I have ever heard of heirloom grapes.  They had some grapes on hand and they were about 50% smaller than the other grapes.

We then headed off to Saintsbury (http://www.saintsbury.com/). This was a wonderful little winery, with only an outside patio with a couple of tables for tasting. Ralph, the cat, joined us for the time, mostly sleeping on our table. Carly did a great job showing us some of the wines they have been producing – Chardonnay and Pinot Noir.  The concierge at the hotel we stayed at described them as “elegant” and that pretty much sums it up.

Tasting area at Saintbury

Carly poured the wine, and Ralph supervised
 

Our last night there, we tried out Brix (http://www.brixnapavalleygrille.com/), at the recommendation of the hotel.  It was a wonderful dinner with very “California” menu. Geoff chose the pork and I enjoyed the chicken.  We sat under a vine covered patio as the night air settled in. After dinner we walked through the kitchen garden, enjoying the last sips of a delicious wine (http://www.decoywines.com/wines/dc-pn/dc-pn-avpn/2009/) before ending our night in Napa.
We had a wonderful time and to be a cliché ...if you ever find yourself in Napa take a few minutes to explore and find some wine that you enjoy!


Thai Night!

I don’t know what those folks in Thailand have got going on but they do great food! It has a wonderful combination sweet-salty-sour-and heat. I first got turned on to Thai food when I was doing a placement in my Masters of Social Work program.  I worked with Conestoga College and the University of Guelph to bring 5 Thai women to Canada and prepare them to attend the university.  These women had a deer in the headlights look for many weeks and wanted to have some of the comforts of home so we spent a lot of time in Thai restaurants.
Since that time, I have explored many other Thai restaurants and have taken a class in Thai cooking at Conestoga College. It is amazing that the classic Thai dish, Pad Thai, is street food. That would be great street food! In Canada it can be a little challenge but it is getting easier. There are some grocery stores with wonderful international food section that have these items, and even some of the fresh items like the hot chilli peppers. If you are in larger centres, you can find Asian grocery stores that keep you in supplies. Of course you can always find great substitutes that will make it your own.
I had not made Thai in a little while and with the pleasure of having some friends over for dinner it was a great time to pull out the wok and make it a Thai night.  I made a number of dishes: Papaya Salad, Pad Thai and Sticky Rice with Mango for dessert.  
Green Papaya Salad
1
Medium green Papaya
2 tsp
Chopped garlic
2
Fresh Hot Chilies
4 tbsp
Dried shrimp (optional)
2 tbsp
Roasted unsalted peanuts
6
Long beans (or 10-12 green beans)
2
Medium tomatoes
6 tsp
Sugar
4 tbsp
Fish sauce
6 tbsp
Lime juice

Cilantro leaves for garnish


Peel the papaya, cut into quarters and scoop out and discard the seeds. Grate through the largest hole of grater to obtain 3-4 cups of papaya.
Put garlic in a large mortar. Chop chilli into quarters and add to garlic. Wash and drain shrimp (if using) and add to mortar. Add peanuts. Pound these ingredients with the pestle until they begin to break up. If you don’t have a mortar and pestle, you can also place ingredient in a large Ziploc bag and use a rolling pin to break up.
Trim ends and cut beans in to 1 inch pieces, add to mortar and pound for 1 minute. Add papaya shreds and pound. Cut tomatoes into eights and add to mortar. Pound for another minute.
Add sugar, fish sauce and lime juice and pound working the ingredients from bottom to the top.  Salad is ready when everything has been integrated, some juice has been extracted and the bigger chunks have been broken down but everything is not mush.
Transfer to a serving dish and top with cilantro. This salad can be served immediately or can sit in the fridge for up to 2 hours before.

Pad Thai
So I think people who like Pad Thai land in one of two camps: Ketchup based and Tamarind based.  While there are benefits to both, I tend to prefer the Tamarind flavour. If you are in the Ketchup camp please post your favourite recipe so that there are options for everyone!
1/3 cup
Fish sauce
1/3 cup
Tamarind concentrate (or fresh lime juice)
1/3 cup
Sugar
5 tbsp
Vegetable oil
1 clove
Garlic, minced
3/4 cup
Shrimp
3 eggs
Lightly wisked
2
Chicken breasts, cut in to small pieces
½ pkg
Rice sticks
1 ½ cup
Chicken stock
1 cup
Bean sprouts
½
Carrot, grated
½ cup
Cilantro
¼ cup
Roasted unsalted peanuts
3
Green onions, trimmed and cut diagonally
3
Thai Chilis (these are hot little suckers so more or less depending on preferred level of heat)
1
Lime, cut into 8ths
For a vegetarian option omit the chicken, and shrimp and toss in some tofu.
In a medium bowl, mix fish sauce, tamarind and sugar and set aside.
Prepare rice sticks, according to the package directions.  Remove from water when al dente.
In a wok or large sauce pan, heat 2 tbsp oil over high until hot. Add the garlic and cook until golden. Add the shrimp and cook until pink. Remove from heat and keep warm.  Add eggs to pan and cook until gently scrambled.  Remove from heat and keep warm.  Add more oil as necessary.  Cook chicken small batches at a time. Cook each batch until cooked through and browned.  Remove from pan and keep warm. 
In the wok, add chicken stock, rice sticks and fish sauce mixture. Toss occasionally until fully coated and rice sticks are completely cooked. Add shrimp, eggs, chicken, bean sprouts, carrots.
When plated sprinkle pad thai with peanuts and cilantro. Serve with limes for squeezing over noodles.

Thai Chilis

Sticky Rice with Mango
2 ½ cup
Thai Sticky Rice
2 cups
Unsweetened coconut milk
1 cup
Sugar
1 tsp
Salt
3
Ripe mango, peeled, seeded and sliced


Place rice in a bowl and cover with cold water. Soak for at least 3 hours. Drain and rinse thoroughly.
Line the bottom of a steamer with cheesecloth or parchment paper. Place the soaked rice in the steamer. Cover the steamer and place on pot filled with a few inches of water. Bring the water to a slow boil and allow the rice to steam for 30 minutes.
Meanwhile, stir the coconut milk, sugar and salt together in a saucepan. Cook, stirring over medium heat until the sugar dissolves. Set aside.
Please the hot rice in a bowl and pour over the coconut milk mixture over it. Stir until it is completely combined.              
To serve, scoop out 2-3 tablespoons of the rice mixture onto individual plates and top with sliced mango.

ENJOY!
Sunday, September 4, 2011

Cambridge Cheesecake with Mixed Berries

Cambridge Cheesecake with Mixed Berries
While we were away on vacation, Geoff started to complain about the distinct lack of cheesecake in his life! Can you believe this?  Let me say that his memory is short – he seems to have forgotten the White Chocolate Grand Marnier Cheesecake and Autumn Cheesecake with slivers of apples and cinnamon on top to name but a few that have graced his table. I will admit that I do not make many cheesecakes, maybe just one or two a year as I don’t really find them a challenge anymore.  One year, while living in Yarmouth, Nova Scotia I made a little extra money before Christmas by making cheesecakes for people. I was surprised by the response and ended up making about 40.  Needless to say my technique was mastered and the thrill was gone. 
There are a few things that I learned in this process that has made my success rate much higher. First, get all of your ingredients to room temperature before you begin. Trying to get cold cream cheese to blend to a silky smooth texture is like trying to turn crushed stone in to sand. This will happen but will take forever. Secondly, use a bain-marie (water bath). To do a bain-marie you need to wrap the spring form pan in layers of foil (so water does not get in) and place in a larger pan that can be filled (half way up the side of the spring form pan) with hot water. This really helps keep moist and delicious. Also, have fun with the crust. I know that graham cracker is traditional but why not try other cookies – ginger snap? Lemon? This can add a nice, easy twist to a favourite. Additionally, take the time to wait for the cake to cool completely and refrigerate, at least, over night for best results. Finally, don’t worry about little cracks in the cheese cake that it what toppings like berries, sauces, and whipped cream can solve. No one will notice – I promise!
This recipe came complements of Wolfgang Puck (http://www.wolfgangpuck.com/recipes/view/9998/Spago-Cheesecake).  He calls is Spago Cheesecake, but since it is from my kitchen and I put my own twist on it I call it Cambridge Cheesecake with Mixed Berries. I used mixed berries but you can put anything on top or even just add a little sauce on the side (chocolate, etc). And I made it for a progressive dinner with our neighbours – appetizers and entre at their house then dessert and hot tub at ours. A perfect evening!


Butter Crunch Crust
4 tbsp
Butter
½ cup
Flour
½ cup
Finely chopped pecans or walnuts
2 tbsp
Brown sugar


Filling
1 ½ lbs
Cream cheese
1 ¼ cup
Sugar
¼ tsp
Salt
¾ cup
Sour cream
1 tbsp
Dark rum
1 tbsp
Lemon juice
2 tsp
Vanilla extract
3
Eggs
2 cups
Mixed berries
1 jar
Apple jelly
1 cup
Whipping cream


Position racks in the centre of the oven and pre-heat to 350F.
In a large bowl, combine all ingredients of the butter crunch with your hands, until the mixture resembles very small pebbles. Press the Butter Crunch Crust into the bottom of a 9 inch spring form pan and cover base completely.  Wrap heavy-duty foil (or 2 layers of regular foil) around the bottom and up the sides of the pan, pleating to tighten. Bake crust for 8 minutes until lightly golden.
To make the filling place cream cheese, sugar and salt in a large bowl of an electric mixer and beat on medium speed until smooth, occasionally scraping down sides (this is important otherwise there will be lumps). Turn up the speed to high and beat until nice and silky smooth. Stop and add sour cream, rum, lemon juice, and vanilla. Beat on medium until blended. Add eggs and beat until smooth. Scrape the mixture into the spring form pan and set the pan in the centre of a larger pan (I use a turkey roaster). Pour enough hot water (I just use hot tap water) into the larger pan until it come half way up the side of the spring form pan (ta-da you have just done a bain-marie) but not above the top of the foil.
Carefully place both pans in the oven and bake until the top is lightly golden brown (about 1 hour and 10 minutes). Remove from oven and carefully lift out the spring form pan and place on a rack, remove the foil to help with cooling. When completely cool refrigerate, covered over night or at least 8 hours.
Once completely cool, and before removing the cake from the spring form pan, run a knife around the outside of the pan to make sure that there is nothing sticking.  Arrange berries on the top of the cake ( I like to do this before removing the ring of the spring form pan so that the berries stay in place until after the jelly is set again).  Place apple jelly in a small sauce pan and heat until smooth.  Once the jelly is smooth, brush jelly over top of the berries using a brush until all are coated. Remove ring. Whip whipping cream and either pipe around the outside or serve on the side of the cake.

If you really want to take this over the top...serve with some port! Delish!
ENJOY!  


St. Pierre Adventures

I have been away on vacation to Newfoundland as I have not been cooking for myself; I have not been doing the occasional update on my culinary adventures.  TO be honest, I have actually missed it. That being said, while we were in Newfoundland we made the trek over the Burin Peninsula to go to St. Pierre.  I am a little ashamed to admit that I have never been to this little piece of France that resides a mere 25 km off shore from Newfoundland.  And for someone who so enjoys food, and the “joie de vive” that the French seem to have made a national motto, not getting there was just wrong. 
With camera in hand, I took pictures of the food.  Every time food was placed before me is was just so beautiful.  Presentation to the French is so important. It is part of the experience.  This is not something that I have placed a great deal of thought, focusing more on the taste, texture, flavour combinations, and, even, wine pairing. I have been inspired by this experience and this will be my next area of focus at my table – probably not for every day meals but for the meals that I put in that extra special effort for guests.
Here are a few photos from my last trip that you might enjoy. 
Newman Wine Vaults - delicious Port and Nationally proected mould (found only here and Oporto, Portugal).


Hazlenut Mousse with Tea

Orange Mousse with Coffee

Even a simple cheese omlette and croissant looks delicious...and it was!

Buried underneath this lemon pastry is the most flaky croissant! YUMMM. But you MUST get to the bakery early as they will all be gone well before 8am.  I really wanted chocolate croissants but the person in front of me got the last ones.  I did not resort to violence but it was tempting.

What are the treasures in your community? 
ENJOY!