Search This Blog

Sunday, December 18, 2011

French Toast Stuffed with Maple Cream Cheese and Strawberries

French Toast Stuffed with Maple Cream Cheese and Strawberries


YUMMY!


Slicing the bread to make a cream cheese pocket


This weekend we are celebrating an early Christmas with Geoff’s children.  Unlike some Step-parents, I enjoy spending time with my s’kids. I especially like being able to try out new recipes and sharing with them.  Over the years, they have begun to request particular recipes and this is one that seems to need to be made on special occasions – which seems to be every time that we are together.
Normally, I like to give credit to my sources or inspiration for recipes but, honestly, I have been making this for so long that I do not remember where it came from.  I am sure that I did not create this out of thin air, I am sure that I am not that creative. It may have been a cookbook, TV Show, menu item, who knows!  Where ever the source this has been a family favorite for a very long time.
Stuffed and ready for the egg dip
This year, I tried to make note of what I do as I have been operating on muscle memory for so long.  Like all of my recipes, you can play with the amounts and proportions for the tastes of those who are in your home.  My disclaimer is that this is probably not the most “heart smarty” dish you will produce in your kitchen but I believe there are times when you need to just enjoy all the delights of the season...well actually, the delights of life.  Make this any day and enjoy!


1
French loaf (not a baguette the larger loaf but you can use other loafs of bread as long as not sliced)
1 pkg
Cream cheese, at room temperature
3 tbsp
Maple syrup (you can use maple syrup like product but I really recommend real maple syrup – go for the real thing)
¼ tsp
Cinnamon
12-15
Strawberries, sliced into ¼ inch pieces
8
Eggs
¼ cup
Milk

Salt and pepper to taste
1-2 tbsp
Butter


In a small bowl, mix cream cheese, maple syrup and cinnamon until well blended.
Here they are in the frying pan ready to be flipped
Slice bread into approximately 1 ½ inch pieces; slice each piece again, leaving the one end attached. Sort of like a butterfly so that you are able to open the slice enough to be able to spread a layer of cream cheese mixture on both sides.  Place a layer of strawberries in between the layers of cream cheese.
Wisk eggs, milk and salt and pepper.
Melt butter in a large frying pan on a medium high heat.  Dip bread in to the egg mixture and fry (3-4 at a time) until golden brown.
Serve with maple syrup, and, in my opinion, bacon or sausages.
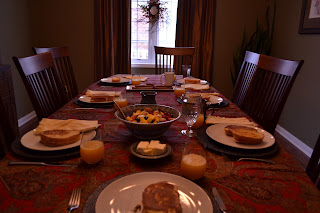
All ready to enjoy!


ENJOY!


Tuesday, December 13, 2011

Sassy Spicy Salsa

I love salsa...and the chips!  It is probably one of the easiest things to make and I normally have all the basic ingredients in the house to pull it together: tomatoes, peppers, jalapenos, onion and a few spices.
Salsa is excellent not just on chips but also spread some on grilled chicken, a burger or add it to some rice for a Mexican flare! Really, just use your imagination and go with it! And did I mention the chips?? Love the chips!
This year, I have been making some preserves and goodies from my kitchen for friends and family.  I love to do this, puttering in the kitchen is a total Zen experience for me. I get into a groove and enjoy tasting the fruits of my labour.
Salsa thickening in the pot!
The first time I made salsa I used the Companys Coming Preserves book.  I have modified 2 of the recipes from that book and came up with my own version that is below.  Just remember to make sure your bottles are well sterilized before putting the salsa in, you don’t want it to go bad before you get to enjoy.  You will need about 10-12 large bottles for this.
4 cans
Diced Tomatoes (19oz)
2 med
Onions, diced
1 large
Green pepper, diced
1 large
Red pepper, diced
3-4
Jalapenos, finely diced (you can add more to your own taste)
1 can
Corn (do not strain, add juice
1 can
Tomato paste (5.5 oz)
¾ cup
White vinegar
¼ cup
Brown sugar
1 tbsp
Coarse salt
1 tsp
Minced garlic
2 tbsp
Chili powder
1 tsp
Cumin

Pepper to taste
2 tbsp
Coriander


Ready for friends, family or your own table!
Combine all ingredients in a large pot. Bring to a boil uncovered over medium heat, stirring occasionally.  Boil gently for 60 minutes or until thickened to desired consistency
Close to the end of the cooking, taste to see if you will need to add more jalapenos or seasoning.
Pour into hot sterilized jars, leaving ¼ inch to the top. Seal.   
ENJOY!


Sunday, December 11, 2011

Easy Appetizers

Easy Appetizers
We have won the neighbor lottery! We have known this for some time but it truly gets confirmed each time we spend time with the Howdens.  Last night was another one of those evenings.  Sharing an evening with friend who enjoy good food, wine and company is delightful. Lately, these evenings have been progressive parties – starting at their house and ending at ours, everyone getting to share the gifts from the kitchen. 
We decided that last night was to be a tapas (aka appetizers) evening.  I remember back in the day when the most common party appetizer was a toothpick with cut up Vienna Sausages, a pickle and piece of cheese! Not that these is anything wrong with these treats, I have been known to tuck into them given the opportunity but I do like to find other equally easy and delicious appetizers. These are things that you can have the basic ingredients in house so that you can whip them up at a moment’s notice totally impressing your guests.
Baked Brie with Honey and Pistachios
Baked Brie ready to be served with some crackers
You can get brie bakers in most stores now but you don’t need them necessarily.  I found a 6 inch cast iron frying pan in a second hand store years ago that I have taken as using as a brie baker but a small baking dish or frying pan that will go in the oven will work. I like this one as brie will last for a long time in the fridge and even if I don’t have pistachios I can always use pecans or walnuts.
1
Brie, smaller 4” round. (I prefer brie made from cow milk rather than goat milk for this dish)
6 tbsp
Honey
4 tbsp
Pistachios

Pre-heat oven to 350F. Cut brie into quarters and place in the brie baker (or whatever you are using). Drizzle brie with honey and cover with pistachios. Bake for 3-6 minutes, until warm but not completely melted through.
Chorizo with Red Wine


Chorizo with Red Wine

This is another super easy appetizer that takes only a few minutes to do but is delightful.  One thing that I love about my current kitchen is that I can be at the stove and still visit with friends.  This calls for Chorizo but you can experiment with other types of sausage such as pepperoni, etc.
1 lb
Chorizo Sausage, cut into 1 inch rounds
2 tbsp
Oil
½ cup
Red wine


Serve with Chorizo with some bread to soak up the red wine reductioin.

Heat oil in frying pan on a med-high heat. Add Chorizo to the pan and fry until both sides are golden brown. Carefully add red wine to the frying pan as it may spatter. Scrape all the yummy brown bits off the bottom of the pan and let the red wine reduce until about half the original amount.

Bacon wrapped Apricots with Cheese and Almonds
Bacon wrapped scallops is a staple at many parties and they are wonderful.  This is a twist on that classic that is equally awesome. I did not have any Havarti last night, so I used some maple smoked camembert that I pick up at Upper Canada Cheese Company a few weeks ago.

24
Dried apricots
24
Blanched almonds
24 pieces
Plain Havarti or other type of cheese, in ½ inch pieces
12 pieces
Lean bacon, cut in half

Soak 24 toothpicks in water.
Anything wrapped in bacon is a good idea!
 Make a small hole in the side of each apricot, place inside each apricot an almond and piece of cheese.  Wrap each apricot in a piece of bacon and secure with a toothpick. Heat BBQ grill to medium high, and grill the tasty treats until golden brown.


Delightful!


One more note...
I am sorry that I have not posted lately but I have a very poor excuse – I have been busy!  As well, some of the things which have been coming from my kitchen are destined to be placed in gift baskets for friends and I want them to be a surprise!  I will post them soon!

ENJOY!

Friday, November 4, 2011

Apple Marmalade


Glorious Golden Goodness

I know it is still a little early to be getting ready for Christmas but it is only a few weeks away. Given that I actively dislike being anywhere near the mall during December, I really like to have things done well ahead of time.  I generally start my Christmas planning on or about Boxing Day. I admit this is sick and twisted and there is probably medication out there somewhere to address this concern.
And we are done...except for the taste test
I come from a family that loves to give gifts to one another, it is how we show that we care and are paying attention to what is happening in your life. It is so much fun to see the joy and excitement when you are able to find that exact right item for someone. Another way that I like to show my appreciation for people in life, particularly at the holidays, is to cook and prepare treats from my kitchen. This can be anything from cakes, breads, cookies, jam, jellies, etc.
Last night I started on this production and made Apple Marmalade.  This is a wonderful marmalade that I can make pretty quickly as I normally have all the ingredients sitting in the kitchen. The recipe below is for a single batch but I tripled the recipe and ended up getting 11 bottles, some to keep and some to give away. This recipe comes from the Companies Coming Preserves book. I used my French mandolin (cutting tool not instrument) to slice the apples. It is quite fast and you get uniform slices BUT if you use one be VERY careful and use the guard.  A number of months ago, I sliced the top off of 2 fingers with this handy item! I just use a rasp to take the outside of the orange and lemon.
4
Tart apples, peeled, cored and thinly sliced
½
Small orange, juiced and grated rind
½
Small lemon, juiced and grated rind
½ cup
Water
2 cup
sugar


Prepare fruit, rind and juice. Place in a bowl.
Just coming to the jelly stage
Stir water and sugar in a large saucepan on medium heat until mixture boils.  Add fruit mixture. Simmer uncovered, stirring occasionally for about 45 minutes until fruit is clear and mixture thickens. Cool a small amount to room temperature on a chilled saucer to see if it jells.  When jelly stage is reached, fill hot sterilized jars* to within ¼ inch from the top. Seal. Makes 2 half pints.
*to sterilize jars: place jars and covers in a pot of simmering water for at least 5-10 minutes and remove them from the water immediately before filling. 
A few handy pieces of equipment:
·         Wide mouth funnel
·         Silicone tipped tongs
·         Rasp
·         French mandolin

ENJOY!

Tuesday, November 1, 2011

Harvest Pork and Apple Stew

Fall and Slow Cookers go together like peas and carrots – perfect.  Taking a few minutes at the beginning of the day and then being rewarded at the end with the sweet smell of stew (or your meal of choice) wafting through the house is just beyond delightful. By the time you sit down to eat you have long forgotten the 15-20 minutes it took to throw everything in a walk away.
A place set for Geoff - lunch is ready.
This Harvest Pork Stew is one that is in frequent rotation in my kitchen.  I love the balance of flavor with savory meeting sweet.  I first enjoyed this at my cousin’s dinner table and have since made it my own. You can really use any combination of vegetables (turnip, carrot, parsnip, etc); even throw in a few green peas at the end for color.  But the real wonder of this stew is the addition of apples. It adds an amazing flavor pairing with the pork.
The recipe below gives instructions for cooking this in a Dutch oven on the stove, but I will normally brown the pork and sauté the onions and garlic to caramelize and soften then throw it all in the crock pot for the day.
Harvest Pork and Apple Stew
2 tbsp
Butter or oil
1 ½ lb
Boneless pork, cut into ½ inch cubes
2 cloves
Garlic, minced
1 med
Onion, chopped
3 cups
Chicken stock
½ tsp
Salt
¼ tsp
Dried rosemary
¼ tsp
Sage
1
Bay leaf
3 cups
Cubed butternut squash, or turnip, or parsnip
2
MacIntosh apples, cored and cubed (Mac’s work the best as they will dissolve but any apple will do)
2 large
Potatoes, peeled and cubed
2 cups
Carrots, peeled and cubed


Melt the butter in a large skillet over medium-high heat. Add the pork and cook until lightly browned on all sides. Stir in the garlic and onion, and continue to cook until the onion has softened, and the pork is firm, and no longer pink, about 5 minutes,

Just waiting for some crusty bread to dip.

Place the pork and onions into a large saucepan. Pour in the chicken broth, and season with salt, rosemary, sage, and the bay leaf. Bring to a boil, then reduce heat to medium-low, cover, and simmer for 20 minutes.
Stir in the butternut squash, apples, potatoes, and carrots. Return to a simmer, then cook, uncovered until the squash and apples are tender, about 20 minutes. Remove the bay leaf and serve,
ENJOY!


Monday, October 24, 2011

Witch’s Fingers and Monster Claws

Witch's Fingers and Monster Claws ready to head out!

The spooky, scary season of Halloween is just over a week away.  I will admit that this is not my favourite season – LOVE Fall, not so much on the Halloween.  I am not sure why but such is life.  Call me a curmudgeon but I generally do not stay home and hand out treats. Instead, I make Witch’s Fingers and Monster Claws for the wee ghost, goblins, princesses and such that are in my life. That leaves Geoff and me to go out for a lovely dinner on Halloween evening! 
Kids LOVE these cookies!  They are a little creepy and tasty to boot.  I originally found this recipe in a Canadian Living cookbook from 1995...and I have been making them ever since.  I hope you take the time to make these cookies for your ghost or goblin!
Just one more thing....we have new neighbours moving onto the street and I had the thought to bring these over as a "getting to know you gift" but I thought better of it as it may be misinturpreted as us giving them the finger and it is a little early for them to get a true appreciation of my personality.
Witch’s Fingers
1 cup
Butter, softened
1 cup
Icing sugar
1
Egg
1 tsp
Almond extract
1 tsp
Vanilla
2 ¾ cups
Flour
1 tsp
Baking powder
1 tsp
Salt
¾ cup
Blanched whole almonds
1
Tube red decorator gel


In a bowl, beat together butter, sugar, egg, almond extract and vanilla; beat in flour, baking powder, and salt. Divide into quarters. Wrap each and refrigerate until firm, about 30 minutes.
Working with ¼ of the dough at a time (keeping remainder in the fridge), roll a heaping tablespoon (more or less depending on the number and size of cookies you want) into a finger shape. Press almond into one end for the nail. Press in the centre to create a knuckle shape. Using a paring knife, make several slashes in several places to form knuckle.
Bake on a lightly greased or parchment lined cookie sheets in a 325F oven for 20-25 minute or until golden. Let cool for 3 minutes.
Life up almond; squeeze red decorator gel onto the nail bed and press almond back into shape, so the gel oozes out from underneath. Remove from baking sheets; let cool on racks.
Note: if you have limited cookie sheets, let the sheet cool in between batches before putting on the next batch.

Monster Claws
This is the first year that I have tried this, so it is a bit of a work in progress.  These are good but I might tweek the cookies next year.
2 cups
Flour
3 tbsp
Cocoa powder
½ tsp
Baking powder
¼ cup
Salt
½ cup
Butter
½ cup
Sugar
2
Eggs
1
Egg yolk
3 oz
Bittersweet chocolate, melted
½ tsp
Vanilla
¾ cup
Pecans
1 cup
Semisweet chocolate chips

Chocolate decorator sprinkles


In a bowl, whisk together flour, cocoa powder, baking powder and salt. In a separate bowl, beat butter and sugar until light and fluffy. Beat in eggs, yolk, melted chocolate and vanilla. Mix flour mixture until in a ball. Divide into quarters. Wrap each and refrigerate until firm, about 30 minutes.
Working with ¼ of the dough at a time (keeping remainder in the fridge), roll a heaping tablespoon (more or less depending on the number and size of cookies you want) into a finger shape. Press pecan into one end for the nail.
Bake at 350F for 10-12 minutes. Remove cookies to a rack to cool.
Melt chocolate chips. Once melted, brush over cookies, leaving the tip of the pecan (nail) exposed. Immediately cover with chocolate sprinkles.  Place in fridge for 30 min to 1 hour until chocolate has hardened and sprinkles are set.


BOO!  ENJOY!